Thursday, October 17, 2013

creamy tomato & white bean soup with herb & parmesan croutons

crispy croutons in a smooth soupy bite
Who doesn't love grilled cheese & tomato soup?  This recipe unites this classic into one bowl and one bite.  The soup has more body because I've added white kidney beans, which adds a very mild flavour once pureed but doesn't disturb the tomato yumminess of a creamy tomato soup. The addition of beans makes the soup meal-like, as they are a great source of protein and fibre. The homemade croutons are a perfect touch to add texture and flavour, as they are tossed in herbs, olive oil and parmesan.  A perfect meal for a cold fall day.

what you need:
  • 1 large can tomatoes (no salt added)
  • 1 540 mL can white beans, drained (kidney or cannellini) 
  • 1 medium yellow onion, diced
  • 1 bay leaf
  • 1 tbsp butter
  • 1/4 cup cream *optional* 
  • 1 red chilli, thinly sliced *optional*
  • 1 green onion
  • a few slices of day old bread (I used whole wheat)
  • fresh herbs (whatever you have on hand, I used sage, oregano, parsley)
  • parmesan cheese
  • olive oil
  • salt and pepper to taste
what to do:
  1. In a large pot, heat up butter and 1 tsp olive oil on medium heat.  Add onions and sauté until tender and golden.  If you like some heat in your soup, add the red chilli and sauté with onions.
  2. Add tomatoes and beans.  Add bay leaf.
  3. Bring to a gentle boil then turn down your heat down to simmer for about 20-30 minutes.
  4. Preheat oven to 375 F.
  5. Cut bread into bite size pieces.  Finely chop herbs, about 1 tbsp of each.  Place them in a large bowl, then drizzle about 1 tbsp olive oil over bread pieces.  Toss to coat and mix herbs.  Season lightly with salt and pepper.  Thinly slice green onion and set aside.
  6. Line a baking sheet with parchment paper.  Spread bread pieces out - no overlapping for even browning.  Grate parmesan cheese over top of bread.
  7. Bake in the middle rack of the oven for about 5 minutes, or until croutons are crispy and golden brown.  Be sure to check often to avoid burning.
  8. Remove soup from heat and when cool enough to handle, use an immersion blender or a blender to puree the soup until smooth.  Pour soup back into the pot and place it over medium heat, adding cream if desired.  Taste, and add salt and pepper as desired.
  9. Serve soup hot, sprinkle a few green onions on top and then top with a few croutons.  Put extra croutons in a separate small bowl for extra dipping (this way they don't all get soggy right away!) - Enjoy!

Sunday, October 6, 2013

mah jong mien (aka peanut butter noodles)

a light meal that is rich in flavour
I have no idea why this is called Mah Jong Mien in Taiwan, as it has nothing to do with the game of tiles, but it has been a staple go to meal growing up in our household.  My mom is the queen of putting together a healthy home cooked meal in minutes from items found in her pantry and fridge, and this peanut butter noodle dish is just one of those.  I think we ate this as kids weekly - and still do whenever we are home to visit.  My mom's version is even simpler - she mixes peanut butter, soy sauce, rice wine vinegar, and garlic together in a bowl until smooth then tosses it with the noodles and vegetables.  It's super easy and tasty.  Below is my take on our family staple.

what you need:
for the peanut sauce
  • 2 heaping tbsp natural peanut butter
  • 2 tbsp naturally brewed soy sauce
  • 1 tbsp rice wine vinegar
  • 2 slices fresh ginger
  • 1 large garlic clove
  • 2 green onions
  • 1/2 cup cold water
  • 1/2 tsp sesame oil
  • 1 tbsp grapeseed oil (or vegetable oil)
  • 1 tsp white pepper 
for the noodles
  • 4 servings of any dry asian noodle, you can even use pasta (e.g. linguine)
  • 2 medium carrots
  • 1 handful fresh cilantro
  • a small bunch broccolini (or broccoli) 
what to do:
  1. Start by getting your sauce ready.  Thinly slice ginger and roughly chop garlic.  Cut off bottom white part of green onions (about 2 inches) and slice lengthwise.  Get the rest of the ingredients for the sauce measured and ready on hand.
  2. In a small sauce pan on medium, heat up grapeseed and sesame oil.  Add ginger, garlic, and onions.  Sauté for about 1 min, then deglaze with the water.  Add soy sauce, peanut butter, vinegar, and white pepper.  Stir until peanut butter dissolves, and reduce heat down to a simmer.  Allow it to reduce to about half.
    garlic, onions, and ginger sautéing
    reducing sauce
  3. Get a large pot of water on the stove on high heat to cook the noodles.
  4. While waiting for the pot to boil, clean and prepare vegetables.  Peel and grate the carrots, and slice broccoli into long slim pieces.  Slice remaining green onion on a bias and roughly tear cilantro.  
  5. Once the water is boiling, add noodles.  Depending on what kind of noodles you are using, your cooking time will vary.  Whatever your package indicates, set your timer for 1 minute shy of it's cooking time.  This is because you want to put the vegetables in with the noodles to cook for 1 minute.  
  6. Drain noodles and vegetables, reserving about 1 cup of the cooking liquid.
  7. Return noodles and vegetables to pot and pour reduced peanut sauce over noodles and toss.  You may need to add a little bit of the cooking liquid if the noodles seem too dry.  Toss in some of your cilantro and green onions, but reserve a small amount for garnish.
  8. Transfer noodles to serving platter and top with cilantro and green onion for garnish.  Serve with your favourite hot sauce if desired - we used sriracha.  Enjoy!
with sriracha

Sunday, September 22, 2013

banana pear & oatmeal muffins


These muffins are a great morning treat or snack, as they are packed with fruit and rolled oats!  The grated pears and banana help keep the muffins moist so you don't have to use very much oil, and the natural sweetness of the fruits allows you to cut down on the use of refined sugar.  Madi (my one year old) loves these and gobbles them right up.

what you need:
*best if everything is at room temperature
**makes 24 medium sized muffins
  • 1 cup whole wheat flour
  • 1/2 cup all purpose flour
  • 1 cup rolled oats (I used 1 min quick cooking rolled oats)
  • 1 tsp baking soda
  • 2 tsp baking powder
  • 1/2 tsp salt
  • 1 tsp cinnamon
  • 2 tbsp vegetable oil
  • 2 large bananas, mashed well
  • 1-2 pears (to get 1/2 cup grated pear)
  • 1/4 cup sugar, + 2 tbsp sugar
  • 2 eggs
  • 3/4 cup milk
what to do:
  1. Preheat oven to 400 F.
  2. Combine flours, rolled oats, baking soda, baking powder, salt, cinnamon, and 1/4 cup sugar together in a bowl. Stir to combine. 
  3. In a mixer (or with electric hand beaters), beat eggs and 2 tbsp sugar until light and airy, about 2 minutes.  Add milk, oil, grated pear, and mashed bananas.  Add dry ingredients and mix just until incorporated (do not overmix or muffins will be dense).
  4. Line 2 muffin tins with medium cups.  Fill with batter and then bake for 10 min, or until very lightly golden on top and toothpick comes out clean.
  5. Remove and cool when ready to handle on cooling rack.  Once at room temperature, store in air tight container.  Enjoy!

Monday, July 29, 2013

meatless "antipasto" platter

perfect for sharing
serve with homemade pita bread
This meal is perfect for a night in with friends or a date night.  Lots of tasty bites to share, and all even better with a glass of wine.

Before I made this I had only tried artichokes in their jarred form, or on top of pizza or in a salad at restaurants.  The fresh green ones at the grocery store have always intrigued me, and I've seen how they are cooked on foodnetwork, but never tried it.  I decided to go for it and it was definitely worth the effort.  It was a perfect on this "antipasto" platter - quotations because it's not the traditional italian kind with cured meats and pickled veggies etc.  Each component on the platter takes a bit of time to prepare, but you can multitask and enjoy wine while doing it!

what you need:
  • 1 medium sweet vidalia onion
  • 1 red bell pepper
  • 1 head of garlic
  • fresh pita bread (check out my homemade pita recipe)
  • 1-2 artichokes
  • 1 small package of king oyster mushrooms
  • assorted cheeses of your choice (I used some feta, sharp cheddar, and parmesan)
  • pita bread
artichoke dipping sauce 
(mix all ingredients together and refrigerate until ready to enjoy)
  • 1/3 cup mayonnaise (low fat is OK)
  • 1 garlic clove, finely grated
  • 1 lemon's zest and juice
  • salt and pepper

what to do:


caramelized onion

1. Thinly slice onion.
2. In a non-stick pan, melt 1 tbsp butter + 1 tsp olive oil over medium heat.
3. Add sliced onions and turn heat down to medium low.  Caramelized onions take a long time but it's the slow cooking process that draws out the onions sweetness.  You don't want the heat too high or you will just get browning.
4. Continue stirring and checking on your onions as you work on other parts of this platter.  Once the onions are very soft, sticky, and very lightly browned, they are done.

roasted red pepper

  1. If you have a gas range, fire it up and put the red bell pepper directly on the flame, blackening all sides and softening the pepper.  Otherwise, preheat oven to 425 F and roast pepper whole in the oven for 20-30 minutes.  Either method, you know the pepper is ready when it is soft and squishy...be careful it may squirt very hot liquid!
  2. Place cooked pepper in a bowl and cover with plastic wrap.  
  3. Once it is cool enough to handle, remove blackened skin (should slide off easily) - slice thinly and toss with 1 tsp of extra virgin olive oil, pinch of salt and freshly ground pepper.  
blistering on the flames
covered by plastic wrap to steam, then cool
 artichokes
  1. Get a large pot of water boiling.
  2. Wash artichokes by rinsing in cold water, then cut about 1 cm off each end.
  3. Use kitchen scissors to cut tips of each leaf (this gets rid of any potential pointy parts).
  4. Cut a lemon in half and rub all over artichoke to keep it nice and green.
  5. Immerse artichokes in boiling water and cover, turn heat down to medium and cook for 30-40 minutes (bigger artichokes will need more time).
  6. Get an ice bath ready (lots of ice with cold water in a large bowl)
  7. When the artichokes are cooked, drain and immediately immerse in ice bath.
  8. Once cooled, remove and allow artichokes to drain/dry on a cooling rack or paper towels.
trimmed and leaves cut, ready for boiling
draining water out
roasted mushrooms & garlic

1. Preheat oven to 400 F.
2. Cut king oyster mushrooms length wise, about 0.5 cm thick.
3.  Toss mushrooms with 1 tbsp melted butter, a pinch of salt and pepper.
4. Line a baking tray with parchment paper and place mushroom slices on, do not overlap.
5. Cut off tip of garlic head, about 0.5cm, to expose tops of cloves.
6. Drizzle top with a little bit of olive oil and sprinkle with salt and pepper.
7. Wrap tightly in foil and place on corner of baking tray, alongside mushrooms.
8. Check at 10 minutes to see if mushrooms need a flip.
9. Roast for about 15-20 minutes, until garlic is soft and mushes easily, and mushrooms are soft and slightly golden brown.

feast!

Wednesday, July 10, 2013

"spaghetti" pizza parcels

these little parcels are easy to eat,
leftovers make a great lunch!
These were inspired by my 11 month old daughter, Madi. She is not the best little eater so meal time is quite the challenge! However, recently we have found that she really loves black beans, and all kids seem to love tomato pasta sauce.  With lean ground beef, tender veggies and a cheesy topping, this combination is definitely a hit. This little parcel uses the same dough as the thin crust pizza.  You can eliminate the beef to make this a vegetarian dish.

what you need:
*makes 18 

  • 1 can black beans (540 mL)
  • 1 can diced tomatoes (~400 mL)
  • 2 tbsp tomato paste
  • 2 large garlic cloves
  • 1 medium yellow onion
  • 1 large carrot
  • 2 celery ribs
  • 450 g lean ground beef
  • 1 tbsp chopped fresh oregano
  • salt and pepper
  • 1 tbsp olive oil
  • 1 cup shredded sharp old cheddar
  • 1 egg 
  • 1/3 cup flour 
  • 3 thin crust pizza doughs (if they were made ahead and frozen, take them out to thaw while you make the filling)
what to do:

filling
  1. Prepare veggies (celery, onion, carrot) - wash thoroughly, remove peel from onion and carrot, then dice into small cubes.  Set aside in a bowl.
  2. In a large pot over medium heat, warm olive oil then add diced onion, carrot and celery.  Sauté for 5-10 minutes, stirring often and allowing veggies to soften and lightly brown.
  3. Finely chop garlic and add to the pot, sauté for another minute.
  4. Add ground beef, breaking up into small pieces with a wooden spoon.  Continue sautéing and stirring, about 5 minutes.  Season with salt (~1/2 tsp) and freshly ground black pepper.
  5. Drain and rinse black beans.
  6. Add diced tomatoes, black beans, tomato paste and oregano.  Stir to mix evenly, then put lid over pot and turn heat down to medium-low.  
  7. Allow this to simmer for 45 minutes, occasionally mixing and checking to avoid burning at the bottom.  
  8. After 45 minutes, lift lid and simmer for another 5 minutes.  Excess liquid will evaporate and allow filling to thicken so that the pizza parcels won't be soggy.  Transfer to bowl to cool to room temperature.
pizza parcel assembly
  1. Preheat oven to 400 F.
  2. Line two baking sheets with parchment paper.  
  3. Crack egg into a small bowl and beat with a fork.  Get cheddar cheese ready.
  4. While filling is cooling, sprinkle work surface generously with flour (to avoid dough sticking).  Roll out pizza dough until quite thin and somewhat rectangular in shape (doesn't have to be perfect).  Cut into 6 even-ish squares.  
  5. Spoon about 2 tbsp into the centre of the squares, then pull up all four corners and pinch together.    It's ok if the filling is not completely sealed by the dough.  Transfer parcel onto baking sheet.
  6. Once 6 are on the baking sheet, lightly brush tops of parcel with egg wash and then top with shredded cheese (about 1 tbsp).  
  7. Place in oven centre rack, bake for 13 minutes, until tops are golden brown.  Remove and allow to cool slightly before serving.  Enjoy!

Tuesday, May 28, 2013

cali in a bowl

perfect for summer
This salad is inspired by Californian fruits and the very popular creamy poppy seed dressing.  I couldn't find poppy seeds in my grocery run today so I substituted with black sesame seeds.  It added the same texture as poppy seeds would and you wouldn't even know the difference because the flavour is so mild.  We will definitely be making this salad all summer long - it'll be even better when the local strawberries are available.

what you need:
for vinaigrette
  • 1 lemon (juice and zest finely grated)
  • 1/4 cup canola oil
  • 3 tbsp red wine vinegar
  • 2 tbsp honey
  • freshly ground black pepper, pinch of salt
  • 1/2 shallot
  • 1 heaping tbsp poppy seeds or black sesame seeds
  • 1 avocado
  • baby spinach 
  • 1 mandarin orange
  • 8-10 strawberries
what to do:
  1. Blend all vinaigrette ingredients (except for seeds) together until smooth.  Add seeds.  Store in a mason jar in the fridge.
  2. Prepare strawberries by washing, removing tops and slicing into bite size pieces.  
  3. Prepare mandarin orange by peeling and removing extra bits of white pith.  Break into individual wedges and cut them in half.  This might seem like an extra step but it's worth it to remove any unwanted seeds and also allow the orange juices to flow into the salad.
  4. Toss strawberries and oranges slices together in a salad bowl.  When ready to serve, toss with desired amount of baby spinach and vinaigrette (unused portion of the vinaigrette can be stored in the fridge for up to 5 days).  Top salad with slices of avocado.  Enjoy!

tonight we had our cali salad with tilapia & ginger pickled radish

Tuesday, May 7, 2013

pita

fresh homemade pitas topped with old cheddar
These pitas are perfect for dips & wraps and have a pleasant chewy and soft texture.  This recipe is exactly the same as the thin crust pizza one - the only difference is keeping the dough slightly thicker when rolling it out and brushing the top lightly with olive oil (flavoured is a great option!), your favourite herbs and/or cheese.  Bake them at 425 F on a pizza stone or a cookie sheet for 8-10 minutes until puffed up and very lightly golden browned - too long in the oven will make them crispy rather than soft.  Enjoy!
divided into 8 balls
cover with a damp tea towel and allow to rise in a warm place
dough after rising for the second time

Sunday, April 14, 2013

avocado toast

a quick nutritious snack
I almost didn't post this because it's embarrassingly easy...but its so delicious and good that I had to share!  The creamy avocado and the combination of sweet and salty make this piece of toast very satisfying.

what you need:
  • multigrain bread (my favourite for this is Bavarian multigrain)
  • 1/2 avocado
  • lemon
  • freshly grated black pepper
  • sea salt (or regular salt)
  • honey (~ 1 tsp)
what to do:
  1. Pop the toast in the toaster.  While it's toasting, cut avocado in half, squeeze a little bit of fresh lemon juice on flesh to prevent browning.  Spoon avocado out onto toast, and gently press to spread it.  Drizzle honey on top, and finish with pinch of sea salt and lots of pepper.  Enjoy!

Thursday, April 4, 2013

tilapia red thai curry

soul warming
I'm a big fan of all curries but my favourite go to is the red thai curry.  The tilapia held up really well in the sauce and soaks up the curry flavour beautifully.

what you need:
*serves 4
  • 500 g tilapia
  • 3 tbsp red thai curry paste (I've used Mae ploy and Aroy-D brands, both good!)
  • 1 sweet potato
  • 2 carrots
  • 1 onion
  • 3 cloves garlic
  • juice of 1 lime OR 1 tbsp rice wine vinegar
  • 2 tbsp brown sugar
  • 1 tbsp naturally brewed soy sauce
  • 240 mL coconut milk 
  • 2 tbsp canola oil
  • 1 red thai chilli *optional
  • 1 green onion
  • 1 handful fresh cilantro
what to do:
  1. Clean vegetables, peel, then dice into bite size pieces.  Roughly chop garlic.  Separate cilantro stems from leaves.  Finely slice green onion and keep it aside with the cilantro leaves for garnish later.  Finely slice red thai chilli (for less heat -  leave it whole BUT be sure to take it out before serving!).
  2. Heat oil in a large pot on medium heat.  Add onions and red thai chilli and sauté for 2 minutes, then add garlic, carrots and sweet potato.  Stir, lightly browning, then add curry paste.
  3. After 1-2 minutes of sautéing with curry paste, add coconut milk.  Fill empty coconut milk can with cold water and add to pot.  Add sugar, lime juice, soy sauce and cilantro stems.  Stir, then cover tightly with lid.  Allow to simmer on medium low for 15 minutes.
  4. Cut tilapia into large chunks.  Season tilapia lightly with salt and freshly ground black pepper.  Add to pot and bring heat up to medium and allow fish to simmer with the curry sauce for 8 minutes.
  5. Once fish is cooked (white throughout) - curry is ready to be served.  Serve it over rice, and garnish with cilantro & green onions.  Enjoy!

Wednesday, April 3, 2013

almond butter hummus

pretty tasty!
It's Wednesday again - lunch potluck with the mommies and babies.  I had a craving for hummus so I decided to get to the grocery store early to make sure I had time to make it...I always tell myself I should make a list but I thought, I know what goes in hummus, no list needed!  Of course I'm in the middle of making this and I realize I have NO TAHINI...I am devastated as I watch the chick peas whirring in the food processor.  I added a tiny bit of sesame oil but it still wasn't quite right.  Then I found some almond butter - it obviously has a slightly different flavour but the thickness is about the same as tahini and it helped emulsify the puree.  I actually like this hummus twist I think I'll be making it again!

what you need:
  • 1 can chick peas (540 mL) - drained but save the juice
  • 1 lemon, zest and juice
  • 1 large garlic clove, roughly chopped
  • 1 1/2 tbsp all natural almond butter
  • 1/2 tsp sesame oil
  • 1/4 salt
  • freshly ground black pepper
  • 1 tsp red wine vinegar
  • 1-2 tsp olive oil
  • smoked paprika *optional
what to do:
  1. In a food processor, blend all ingredients.  Loosen the puree with small amounts of chick pea juice until desired consistency.  Allow dip to sit for an hour before serving (allows the flavours to come together).  Sprinkle with paprika.  Enjoy!

Monday, March 18, 2013

linguine alla lentils

a pasta dish that doesn't miss meat
Lately I've been really loving red lentils.  It's so easy to cook and it takes on flavours really well. It is the perfect replacement for ground beef in this pasta sauce; it helps thicken it and clings to the linguine beautifully.  Serve it up with some whole wheat pasta and you'll feel satisfied & full without feeling heavy.

what you need:
  • 1 medium onion (yellow or red, doesn't matter)
  • 2 medium carrots
  • 2 sticks of celery
  • 3 large garlic cloves
  • 1 cup red lentils
  • the rind of Parmesan (about 3x1" is enough)
  • 1 large can of diced tomatoes (san marzano best)
  • 1 tbsp oregano
  • 1 tsp red chilli flakes
  • 1 dried bay leaf
  • 1 handful fresh flat leaf parsley
  • salt & pepper
  • 2 tbsp olive oil
  • Parmesan cheese for garnish
  • about 1 cup of water
  • whole wheat linguine
what to do:
  1. Prep onions, carrots, and celery but washing, peeling, and dicing into small pieces. Roughly chop garlic.
  2. Rinse dried lentils.  Get spices and other ingredients ready to go.
  3. In a large pot on medium heat, add 2 tbsp olive oil.  Sauté onions, carrots, and celery until softened and lightly browned.  Add garlic and parmesan rind and continue stirring.
  4. Add rinsed lentils, red chilli flakes and oregano.  Stir to avoid burning.  Add canned tomatoes after about a minute or so, water, and bay leaf.  Season with salt and pepper.  Cover and once it all boils, bring to a very low simmer.  
  5. Let it simmer for about 45 minutes but check regularly and stir to avoid the bottom burning.  Add 1/4 cup of water at a time when needed (if the sauce is too dry it will burn easily).
  6. In the meantime, roughly chop parsley and grate Parmesan cheese for garnish.
  7. Cook whole wheat linguine as directed by your package.  
  8. Toss linguine in a large bowl with desired amount of sauce, then plate it up with parsley and parmesan sprinkled on top.  Enjoy!
after 45 min of simmering, thickened and hearty
lentils & veggies provide lots of texture and body

Sunday, March 17, 2013

white chocolate & cherry cookies

take a bite! 
I just had to bake today because I hadn't baked in over a week and I was feeling deprived!  I hadn't made cookies in awhile - and usually my go to are chocolate chip or some variation with chocolate chips in them...but in my pantry I noticed a forgotten bag of white chocolate discs which I had purchased from bulk barn awhile ago.  So I decided to go with the white chocolate...which tends to be quite sweet, so the dried cherries are a perfect tart compliment.

what you need:
*makes 18 large cookies
  • 1/2 cup unsalted butter, at room temp
  • 1 cup all purpose flour
  • 1/2 cup white sugar
  • 1/2 cup brown sugar
  • 1 egg
  • 1 tsp baking soda
  • 1 tsp pure vanilla extract
  • 1/2 cup whole rolled oats (not the quick cooking kind)
  • 1/2 tsp salt
  • 1/2 cup dried cherries
  • 3/4 cup white chocolate discs
what to do:
  1. Preheat oven to 350 F.
  2. Using a paddle attachment of a mixer, or electric beaters, cream together butter and sugars in a large bowl, until smooth and well mixed.
  3. Add egg and vanilla, beat for 1-2 minutes.
  4. Sift together flour, baking soda, and salt.  Add rolled oats.  Add these dry ingredients to butter and sugar mixture.  Mix until incorporated.  
  5. Chop white chocolate discs into halves.  Add chocolate and cherries to cookie dough, mix.
  6. On a baking sheet lined with parchment paper, drop large spoonfuls of cookie dough, 6 per cookie sheet.  
  7. Bake for 10 minutes.  Cookies may look slightly undercooked in the centre, but lightly golden browned on the outside.  Don't worry, this will keep them chewy/soft in the centre and they will continue to cook a little as they cool on the pan.  When they are cool enough to handle, transfer them to a cooling rack.  Enjoy!
perfect for dunking

Friday, March 15, 2013

breakfast bake

This breakfast dish is perfect to make for a big group!  You prepare it the night before, so  in the morning all you have to do is fire up the oven and let it bake away while you get to hang out with your friends.  Every year we have a little PT family reunion and we spend the weekend playing games, doing winter activities, and drinking lots of beers!  The breakfast bake has been loved by all and we make it every time.  

Sorry there is no photo...every time I make it I have good intentions of taking a photo but we are so hungry by the time it's baked I serve it up and then realize I haven't taken a photo!

what you need:
*serves 8

  • one loaf of multigrain bakery bread (day old best - it will have more texture, plus it's usually 50% off!)
  • 10 eggs
  • 3 tbsp milk
  • 1 medium red onion
  • 1 red pepper
  • 1 orange pepper
  • 3 italian sausages
  • asiago cheese
  • your favourite hot sauce or srriracha *optional
  • salt and pepper
  • cooking oil
what to do:
the night before...
  1. Butter a baking dish (9"x13").  Be sure to grease it well to ensure easy clean up after! Or you can line it with parchment paper.  
  2. Cut or tear bread into large bite size chunks.
  3. Cut onions and peppers into large bite size chunks.  Cut sausage into bite size pieces.
  4. In a non-stick pan, heat up oil on medium.  Add sausage and sautee until golden brown on the outside (doesn't have to be fully cooked yet) - remove and then in the same pan, sautee vegetables for a few minutes, until onions are softened.
  5. In a large bowl, whisk eggs until slightly frothy (2-5 minutes).  Add milk and add desired amount of hot sauce (I used 2 tbsp) - season eggs with some salt and lots of freshly ground black pepper. Whisk again to mix well.
  6. Add sausage, vegetables, and bread pieces to egg mixture.  Toss to mix everything, then pour into buttered baking dish, cover with plastic wrap and refrigerate until ready to bake.
the morning....
  1. Preheat oven to 350 F.  
  2. Grate asiago cheese (about 1 cup) and sprinkle over top of the breakfast bake.  Cover with aluminum foil (tent it so it doesn't stick to the cheese).
  3. Bake for about 30 minutes, then increase the temperature to 375 F and bake for another 15 minutes.  Remove the foil carefully, then broil for the last minute to brown the cheese on top.
  4. Let it cool for a few minutes, then slice and serve.  Enjoy!!

Thursday, March 7, 2013

hearty lentil miso soup

this isn't like the stuff you get at sushi
that's super salty with 3 tiny cubes of tofu 
a light meal that warms & fills you up like comfort food
I talked to my mom today on FaceTime (well, she really just wanted to see Madi!) - she told me about a salmon miso noodle soup she made the night before.  It sounded pretty tasty and I immediately craved the taste of miso (it's got umami, that 5th taste bud) so I decided to try something similar out with the haddock I had in my freezer.  Thanks for the inspiration mom!

You can leave the haddock out and replace it with soft tofu for a vegetarian option.

what you need:
*serves about 4
  • 150 g package of enoki mushrooms
  • 4 portions of haddock (about 16 ounces of fish)
  • 1 cup dry red lentils
  • the tops of one whole celery stalk
  • 1/4 cup organic miso paste
  • freshly ground black pepper
for the broth
  • 6 cups water
  • 1 large carrot
  • 1 large onion
  • 2 sticks of celery
what to do:
  1. Peel carrot and onion.  Cut carrot, onion, and celery into large chunks.  Place into a pot.  Add water.  Bring to a boil, then turn it down to medium low to simmer for 40 minutes.  Discard the vegetables and keep the pot on the stove on medium heat.
  2. Add lentils to the broth.  Cook for about 15 minutes.  
  3. Cut off the rough bottoms of the enokis and separate them into smaller bundles, then add to the broth. Stir in the miso paste.
  4. Cut the fish into large chunks.  Roughly chop celery stalk tops.  Safe a few leaves for garnish. Add fish and celery to soup and cook on medium heat for about 10 minutes, until the fish is cooked through.  Ladle into soup bowls and garnish with freshly ground black pepper and celery leaves.  Enjoy!

Wednesday, February 27, 2013

cinnamon maple granola


homemade granola beats the grocery store's everytime
sprinkled on top of greek yogurt...mmm...
This is so easy you'll never need to buy store-bought granola again.  You can pretty much add any dried fruit or nuts you fancy.  Enjoy it with yogurt, ice cream, milk, or even on top of salad to add a crunchy texture.  

what you need: 
*makes about 1 large mason jar
  • 2 cups rolled oats (NOT the quick cooking kind)
  • 1/2 cup pitted prunes
  • 1/3 cup dried cherries
  • 1 tbsp cinnamon
  • 3 tbsp maple syrup
  • 1/2 cup whole almonds
what to do:
  1. Preheat oven to 375 F.  Line a baking sheet with parchment paper.
  2. Roughly chop almonds and prunes.
  3. In a large bowl, combine all ingredients and stir to coat all with maple syrup.
  4. Spread mixture onto baking sheet evenly and bake for 15 minutes.  Stir to evenly brown, then bake another 10-15 minutes.  
  5. Once granola cools, transfer to mason jar to store for several days (the easiest way is to gently lift two sides of the paper together, and let the granola slide into the jar).  Enjoy!
makes a great gift!

Tuesday, February 26, 2013

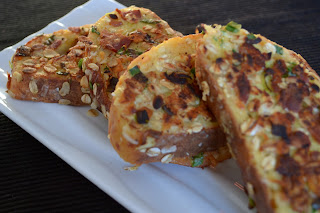
savoury french toast

use a good crusty savoury day old bread
crunchy outside with a soft and chewy inside
I bought this day old "three cheese" loaf of bread (50% off!) from the grocery store and thought it would be awesome for making a breakfast bake (which is a savoury bread pudding) - but then I thought why not try savoury french toast?  I've always thought of french toast as sweet, cinnamon-y and topped with fruit...but last weekend I made french toast for visiting friends and one girl put salt and pepper on hers instead of syrup!  That's how she grew up eating french toast I guess!  That inspired me to create a savoury french toast recipe.  The oats & bacon give it a tasty crunchy outside, while the middle is soft and chewy from the bread and eggs.  

Hills, this one's for you;)

what you need:
*serves 2-3, depending on hunger level 
  • 6 thick slices of day old bread (preferable not pre-sliced, and something savoury like a garlic or three cheese country loaf)
  • 3 large eggs
  • 3 tbsp milk
  • 1 tbsp srirracha
  • 3 strips of bacon (I like the taste and consistency of schneiders naturals) *omit bacon for vegetarian option*
  • 1 green onion
  • 1/3 cup coarse grated parmesan cheese
  • 1/3 cup rolled oats (not the quick cooking kind)
  • salt and pepper
  • butter for frying
what to do:
  1. Cook bacon until crispy and pat dry on a paper towel.
  2. Thinly slice green onion (if you just washed it, make sure you dry it first with a paper towel).  Crumble bacon into a shallow dish and add sliced onions, rolled oats, grated cheese.  Toss to mix evenly.
  3. Crack eggs into a shallow dish that will fit your pieces of bread.  Whisk in milk, srirracha, and add freshly ground pepper and a pinch or two of salt.
  4. Place slices of bread in the egg mixture and allow it to sit for about 1 minute on both sides to soak up egg mix.  Next, place it into the oat mixture and press gently to make sure it sticks to the bread.
  5. In a non-stick pan on medium heat, melt 1 tsp of butter.  Fry up french toast until golden brown on both sides, and then cover with a lid for 1-2 minutes to make sure the middle is cooked through.
  6. Serve hot and enjoy!  I actually liked it with a little bit of maple syrup (sweet & savoury combo) - Ryan ate it with more srirracha!
dinner tonight!

Thursday, February 21, 2013

triple b - bran banana bread

super moist
I love banana bread and I make it probably once every 2-3 weeks.  I've tried many recipes, some that are obviously not the healthiest (but taste so good it's like cake!) - and some so healthy that it is dry and not very fun to eat (so then, why bother right??).  Today I decided to try out my own combination of ingredients;  I was worried the bran would make it mealy or dry but it actually just adds a nice texture and the loaf is still really tender and moist.  If you're a fan of banana bread, you'll want to try this one out.  Get even healthier by using toasted walnuts (or any other  nuts) instead of the chocolate chips. 

what you need:
  • 1/2 cup unsalted butter, melted
  • 1/2 cup non-fat greek yogurt
  • 1/2 cup sugar
  • 3 large bananas
  • 1 cup all purpose flour
  • 1 cup 100% natural wheat bran
  • 1 1/2 tsp baking soda
  • 1/2 tsp salt
  • 1 tsp pure vanilla extract
  • 1/2 cup semisweet chocolate chips
  • 1 egg
what to do:
  1. Preheat oven to 350 F.  Lightly butter a standard sized loaf pan.
  2. In a large bowl, mash bananas with a fork then beat well with sugar until light and fluffy (about 2 minutes).
  3. Combine flour, bran, salt and baking soda in a small separate bowl.
  4. Add butter, vanilla and egg to banana mixture and beat to mix well.
  5. Add flour mixture to wet mixture and using a spatula, fold/stir to mix evenly.  Try not to overwork the mixture.
  6. Add greek yogurt and fold with spatula, just until incorporated.
  7. Pour half the batter into the loaf pan, then sprinkle chocolate chips evenly on top. Top with the rest of the batter, then bake for 40 minutes, until top is golden brown and a toothpick in the centre of the loaf comes out clean.  Remove and as soon as it is cool enough to handle, transfer loaf onto a cooling rack.  Slice and enjoy!
slice it up warm, delicious!
just a little bit of chocolate
in the centre satisfies a chocolate craving

Wednesday, February 20, 2013

meatballs with an asian kick

perfectly delicious on their own
I know what you're thinking - where's the sauce?  But trust me these meatballs are so flavourful and bursting with juices, you don't need to make a sauce for them.  The idea came from the Korean Meatballs from the show Recipes to Riches - a mommy friend has brought them twice to our lunch playdates and they are super tasty and easy to eat.  

These are best served as soon as they are done baking in the oven (we ate a few last night for dinner!) - but still great heated up in the microwave the next day (just made Ryan a wrap for lunch with them).  I am bringing them to our weekly potluck lunch playdate today - I really should be leaving now but Madi is sleep napping away. So I thought I'd blog while I wait!

what you need:
*makes about 40 meatballs
  • 1 kg lean ground beef
  • 1 large carrot
  • 2 sticks of celery
  • 1/2 red onion
  • 3 garlic cloves
  • 1 egg
  • 2 tbsp sriracha
  • 1 tbsp chili soy paste *optional
  • 1 1/2 tbsp naturally brewed soy sauce
  • 1 tsp worcestershire sauce
  • 2 tbsp hoisin sauce
  • freshly ground black pepper
  • cooking oil (canola)
what to do:
  1. Preheat oven to 375 F.  Line a baking sheet with aluminum foil.
  2. Prepare vegetables by cleaning and peeling, then dice finely.  Put diced veggies (onion, celery, carrot) in a large bowl, and grate garlic into the bowl.  
  3. Add the ground beef into the bowl.
  4. In a separate smaller bowl, whisk egg with the rest of the ingredients (except the cooking oil) - pour into the large bowl and using your hands, work the ground beef, veggies, and egg mixture until evenly incorporated (don't overwork the mixture, it will make the meatballs tough). 
  5. Form meatballs with your hands (just bigger than a golf ball) and place them on the lined baking sheet.
  6. In a nonstick pan on medium heat, drizzle a little cooking oil (about 2 tsp) - and lightly brown the meatballs in batches (don't overcrowd the pan!).  Once they are lightly browned on all sides, transfer gently back onto the lined baking sheet (they can be side by side for this part, so they should all fit on one sheet).
  7. Bake in oven for 10 minutes to finish cooking the middle - cut one at 10 minutes to be sure the middle is cooked.  Remove from oven, and immediately transfer to serving dish.  Enjoy!
ready for a quick pan-fry for browning 
stick a toothpick in them for a party appetizer