Showing posts with label asian cuisine. Show all posts

Saturday, October 22, 2011

bok choy salad

my version
the original - Laureen's
A few weeks ago I had this amazing salad alongside a fish fry!  It is super refreshing, light and very addictive.  I made it for Steph's bridal shower and everyone loved it (even those who had never tried bok choy).  The recipe makes quite a big salad - left overs are good until the next day.  Here's my version of the salad:

what you need:

  • 1 package baby or regular bok choy
  • 1 package bean sprouts
  • 2 green onions
  • 1 handful cilantro
  • 1 package ramen noodles
  • 2 cloves garlic, grated
  • 1/4 cup canola oil
  • 1/4 cup rice wine vinegar
  • 1 tsp sesame oil
  • 1 1/2 tbsp brown sugar
  • 1/8 cup soy sauce
  • black pepper, to taste
what to do:

  1. Cut off bottoms of bok choy and separate each leaf individually.  Wash thoroughly allow to dry (pat with tea towel or leave in sieve for awhile).  Rinse bean sprouts and allow them to dry as well, or spread on tea towel and dry gently).
  2. Stack boy choy leaves, about 5 at a time, chop into thin 1/2" slices width wise, and place into a large salad bowl  Finely chop green onions and add to bowl.  Roughly chop cilantro and add.  Then add the bean sprouts.
  3. Mix the rest of the ingredients (except for the ramen noodles) in a jar or tupperware and shake well, until sugar is dissolved.  This dressing can be kept in the fridge for several days.
  4. Right before serving the salad, toss all vegetables with dressing.  Remove the small flavour package from inside the ramen noodles and crush the dried noodles into little bits.  Top the salad with the noodles for extra crunch and texture.  Enjoy!

Tuesday, August 16, 2011

ginger chicken with snow peas

a saucy dish best served over rice
This dish was part of a Taiwanese family style dinner (alongside sticky rice meatballs). This is an easy main course with lots of sauce to accompany any starch - personally I think rice works best. The ginger and snow peas make it fresh and light. It refrigerates well so don't worry about making extra - it's a leftover you'll want. Ryan and I both packed it for lunch and it was just as good the next day.

what you need:

  • 3 boneless skinless chicken breasts
  • 3 cups or so of snow peas
  • 5 round slices of fresh ginger root
  • 2 tbsp finely diced ginger root
  • 1/2 cup chicken stock
  • 1 tbsp corn starch, dissolved in about 1/4 cup water
  • 1 medium onion
  • 3 tbsp soy sauce
  • 1 tbsp rice wine vinegar
  • 1 tbsp brown sugar
  • 3 dashes of Worcestershire sauce 
  • 2 tbsp canola oil
  • 1 tsp sesame oil
  • *optional - 3 dried red chilies

what to do:

  1. Slice raw chicken breast into about 1/3" thick strips, about 2-3" in length.  Marinate in a bowl with the soy sauce, rice wine vinegar, brown sugar, Worcestershire sauce and diced ginger.  Store in fridge, for at least 2 hours (up to 12 hours) and the chicken should soak up most of the marinade.
  2. Slice onion roughly into long strips.  Remove rough ends of snow peas and wash thoroughly.
  3. In a pan on medium, heat up canola oil and sesame oil.  Add the dried red chilies and cook until blackened.  Add the ginger slices and onions - cook until onions are softened but not browned.
  4. Add sliced chicken and be sure not to overlap the strips.  Be sure to flip them to get even cooking on both sides, about 5 min each.
  5. Once the chicken doesn't look raw on the outsides anymore, deglaze the pan by adding the chicken stock.  If it looks like you need more sauce, add a little more chicken stock.
  6. Once the liquid comes to a gentle simmer, turn it down and add the snow peas.  Cook for about 2-3 more minutes then add the water with the cornstarch.  Stir to thicken the sauce.  Give your sauce and chicken a taste - add more soy sauce (1 tsp at a time) if it isn't salty enough.  
  7. Serve hot on top of rice (or noodles, or any starch you like) - enjoy!

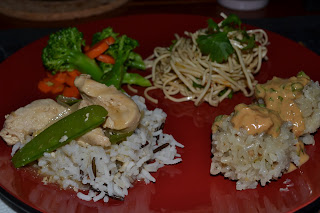
    ginger chicken: bottom left corner, on a bed of white & wild rice

sticky rice meatballs

sticky rice meatballs on the bottom right corner, topped with peanut sauce
OK so this is actually one of my favourites.  I love sticky rice and I love meatballs - so this is the best combo ever!!!  It's a dish I've had in Taiwan and my mom has made it a few times - it does take a bit of work so you want to make them for special occasions or when you have some extra time.  It's not hard - just has a number of steps but its totally worth the effort!  They are great as part of a main course but also could be used as bite size appetizers.  You can eat them on their own or serve them with peanut sauce, which is what I did recently.  My friends Jillian and Criff were in town for only one night and I really wanted to make a special dinner for them.  I went with a Taiwanese family style dinner (with lots of help from my husband, Ryan) and these meatballs were one of the 4 dishes we made.  Our friends loved it!

what you need:
  • 1/2 lb lean ground pork
  • 2 green onions, chopped finely
  • 1 large egg
  • pinch of salt and pepper
  • 1/3 cup breadcrumbs
  • 1 cup glutinous sticky rice (short grain rice, arborio rice would work as well)
  • peanut sauce (see fresh rolls page for this recipe)
what to do:


  1. Boil about 4 cups of water.  Remove from heat and add the rice; let it sit for about 1 1/2 hours.  This step par cooks the sticky rice. (note: this step can be done the day before).
  2. Line a tray with parchment paper.
  3. In a bowl, use your hands to combine the pork, onions, egg, breadcrumbs, salt and pepper.  Form meatballs (about 1 1/2" diameter) and place them on the parchment paper. 
  4. Drain water from rice, and allow the rice to dry for awhile in a strainer or spread out onto a plate lined with paper towel and pat dry.  
  5. Roll each meat ball in the rice until well studded with rice.
  6. Steam meatballs for 20 minutes.  You can use a steamer, or create one by using a bamboo steamer basket over a pot of boiling water. (check out the gourmet sleuth website on how to use a bamboo steamer). 
  7. electric steamer
  8. Remove gently with chopsticks/tongs (be gingerly as you don't want to lose the sticky rice on the tongs!) - serve hot on their own, with a simple sauce of sriracha + soy, or with the peanut sauce for extra flare.  Enjoy!
    best part! eating with friends

Sunday, July 31, 2011

asian-inspired baked salmon

dinner in the oven!

This meal is quick, easy and you won't have any pots to clean!

Sometimes you get home from work and you just don't feel like making a big mess in the kitchen.  This dinner is perfect for those days - all you need is your oven, a cookie sheet and an oven-proof baking dish.  The Asian-inspired flavour combination of salty, sweet, sour, and umami really make this meal satisfying and delicious.

what you need:
*serves 2*

  • 1 small bunch of asparagus
  • 2 pieces of salmon fillet (about 4-5 ounces each)
  • 1 sweet potato
  • 1 green onion
  • 1 tbsp toasted sesame seeds
  • 1 tbsp honey
  • canola oil, olive oil
  • 2 gloves of garlic, finely chopped
  • 1 tbsp grated fresh ginger
  • 2 tbsp soy sauce
  • 5 dashes each of mirin and ponzu 
  • 1 tsp rice wine vinegar
  • salt and pepper
what to do:
  1. Preheat oven to 400 degrees F.  
  2. Mix 1 tbsp canola oil, garlic, ginger, soy sauce, mirin, ponzu and vinegar in a bowl.  Add the salmon and gently roll it around so the entire fish is covered with the marinade.  Set aside in the fridge.
  3. Wash sweet potato thoroughly and leaving the skin on, cut into 1 1/2" thick medallions.  Toss in a bowl with 1 tbsp olive oil, pinch of salt and pepper.  Arrange on one half of your cookie sheet (line with parchment paper or aluminum foil).  Place in the middle rack of your oven.
  4. Trim off tough bottom bits of the asparagus (about 1" off).  Toss the same bowl as above, adding a little more olive oil, salt and pepper as required.  Once the sweet potatoes have been in the oven for about 10 minutes, remove cookie sheet and spread asparagus out on the other half of the cookie sheet, do not stack them.  Return the cookie sheet into the middle rack of your oven.
  5. Cut the green onion on a sharp angle to get the blade effect.
  6. Line a oven-proof glass baking dish with parchment paper (make sure there is extra paper that flows over the edges of the dish) and place salmon fillets in the centre with the skin side up.  Add the rest of the marinating liquid and then take each corner of the paper and bring it to the centre and fold a few times to make a loose package enclosing the salmon.
  7. Check the vegetables in about 10 minutes.  You want to flip the sweet potatoes and roll the asparagus around a little to get even browning.  Once you flip the veggies, put the dish with the salmon onto the top rack of the oven. Continue baking for about 10-15 minutes, depending on how well done you like your salmon.
  8. Remove veggies once they are lightly browned.  Remove the salmon baking dish and cut away the extra parchment paper - turn the oven to broil and put the salmon back in for another minute or two (keep a close eye, it can burn quickly). The skin should crisp up nicely and become golden brown.
  9. Arrange the asparagus, salmon and sweet potatoes on a plate.  Drizzle honey on the salmon and then sprinkle sesame seeds and scallions to garnish.  Serve hot and enjoy!
Enjoy minimal cleaning since you've lined all your bake-ware with parchment paper :)

    Saturday, April 2, 2011

    dumplings

    dumplings cooked two ways
    Once again this recipe comes from my mother, who learned from my grandmother.  I also have an aunt in Taiwan who makes these out of her home and they sell like crazy - when we taught English there we ate them all the time.  These dumplings are traditionally made with ground pork but you can substitute with ground chicken, shrimp, tofu - whatever you like!  They are a bit of a process to make - a lot of fun on a lazy weekend afternoon.  The recipe is enough to fill a large cookie sheet full of dumplings - but no worries they freeze very nicely and make a quick easy meal later in the week. They can also serve as very cute appetizers for a party.
    what you need:
    dumplings:
    • 2 packages dumpling wrappers (found in asian food stores)
    • about 1/2 lb lean ground pork
    • 1/2 cabbage
    • 2 carrots (mom I know you don't put this in but I wanted some extra nutrients)J
    • 3 green onions
    • 1 1/2 tbsp grated fresh ginger
    • 1 1/2 tsp sesame oil
    • 1 tbsp soy sauce
    • 1 tsp freshly ground pepper
    • 1 tbsp salt
    dipping sauce:
    • 2 tbsp soy sauce
    • 1 tbsp freshly chopped cilantro
    • 1 tbsp freshly chopped green onion
    • 1 tsp freshly grated ginger
    • 1 garlic clove, finely grated
    • 1 tsp sesame oil
    • 1 tbsp rice wine vinegar
    • 1 tsp or so of mirin
    • 1 finely chopped red chili
    what to do:
    making the dumplings
    1. Mix the ingredients for the dipping sauce and set aside in the fridge to allow flavours to gel.
    2. Chop cabbage and carrots into 1" chunks and pulse in a food processor until quite fine.  Transfer to a large bowl and add the salt - this will help draw out the liquid.  Transfer into a fine sieve and place it over a bowl - let stand for about 20 minutes.
    3. Some liquid will have dripped away but you will need to take the shredded vegetables in handfuls and squeeze out more excess liquid.  Discard the liquid and place the veggies into a large bowl.  
    4. Finely chop green onions and add to the bowl.  Add the ground pork and the rest of the ingredients (do not add anymore salt).  Mix well with your hands.
    5. Set up an assembly station with a cookie sheet or some sort of tray, a small dish of water, the filling, and the dumpling wrappers.  
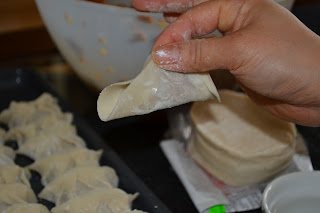
    6. To make the dumpling, take one wrapper and put a small spoonful of filling in the centre.  Dip your finger in water and wet the outside of the wrapper around the filling.  You can fold in half and pinch the two sides to stick together - OR to make them cuter you can fold it in half, pinch, then cinch one side with two extra folds, then the other side.  Make sure it is sealed tight or the filling will fall out when cooking.  It might take a few to practice and play with how much filling you can fit in, but after awhile it will become easier I promise!

    cooking the dumplings:
    *you can pan fry, boil, or even deep fry them - the same methods apply whether they are frozen or freshly made*

    pan fried dumplings (a crunchy edge):
    1. In a non-stick pan, heat about 1 tsp cooking oil on medium.
    2. Place dumplings into pan, arranging them tightly together.  If the pan is full, add 1 cup of cold water (if its half full, use 1/2 cup of water) - place the lid on and allow to cook until water evaporates.
    3. Once the water is gone, add another tsp or so of cooking oil, try to get it under the dumplings by adding it to the edge and turn the pan a few times.  Check the bottom of the dumplings by gently lifting with a spatula - once the bottoms are golden brown they are ready to come off the heat.  
    4. Serve hot with the dipping sauce and enjoy!
    boiled dumplings (chewy and soft):
    1. Bring a pot of water to boil then add a bit of salt (as you would when boiling pasta).
    2. Put the dumplings in - bring to boil again and stir occasionally - be gentle so they don't break.
    3. When the water boils again, add about 1 cup of cold water - bring to boil - then repeat this step again.
    4. Strain or remove dumplings with a spider (if you are making more batches).
    5. Serve hot with dipping sauce and enjoy!
    I've never made the deep fried version at home, but I've had them in sushi restaurants.  I imagine you would have deep fry the dumplings until they are golden brown - to be sure they are done cut one in half to check that the filling is cooked through!

    really important to squeeze the excess liquid out
    or the filling will be too watery to wrap
    put these in a freezer for about 10 minutes and they are ready to
    pack into a freezer bag or container - lasts for several weeks
    extra filling (not enough wrappers) - make great little meatballs

    Sunday, February 13, 2011

    ginger soy beef


    a great dinner entrée - recipe serves 4
    This is another one of my mom's recipes, and she probably got it from my grandma. Everyone who tries it loves it, especially with rice because it absorbs the flavourful sauce.  If you end up with extra no worries - it's even tastier the next day.  

    What you need:
    • 1 onion sliced thinly
    • 1 tbsp diced fresh ginger
    • 2 green onions, sliced lengthwise on a sharp angle
    • 500 g flank steak, sliced thinly against the grain
    • 1 tomato, cut into wedges
    • 3 tbsp cornstarch
    • 2 tbsp soy sauce
    • 5 dashes Worcestershire 
    • 1 tbsp canola oil
    • 3/4 cup cold water
    • 1 tsp red pepper flakes (optional)
    • 2 tbsp Bull Head Barbecue Sauce (made in Taiwan, found in Asian food stores) - if you can't find this, no worries - it will still be good with the ginger and soy)

    What to do:

    1. In a bowl, use your fingers to gingerly mix sliced steak with 1 tbsp soy, Worcestershire and 1 tbsp cornstarch.  Set aside.
    2. Heat oil in a large sautée pan on medium.  Add ginger and onion, stir occasionally until onions soften and are slightly translucent. 
    3. Add the BBQ sauce and stir, coating the onions.  Add the tomato wedges and the beef - try to spread the beef so that it creates one layer in the pan, then after 2-3 minutes turn them over.
    4. In a small bowl, add remaining cornstarch to about 3/4 cup cold water.  Mix well.
    5. Add remaining soy sauce and red pepper flakes to pan.  Once the tomato wedges look shrunken and juices are flowing, stir and slowly add the cornstarch with water.  Let it simmer on medium-low heat for about 2 minutes, or until beef is tender and just cooked through.
    6. Turn heat off - add sliced green onions and stir.  Transfer to serving plate. Serve on top of rice - enjoy!  

    ginger soy beef, garlic sautéed spinach & brown rice

    Taiwanese BBQ sauce