Saturday, October 22, 2011

fruit bouquet

a fun display of fruit
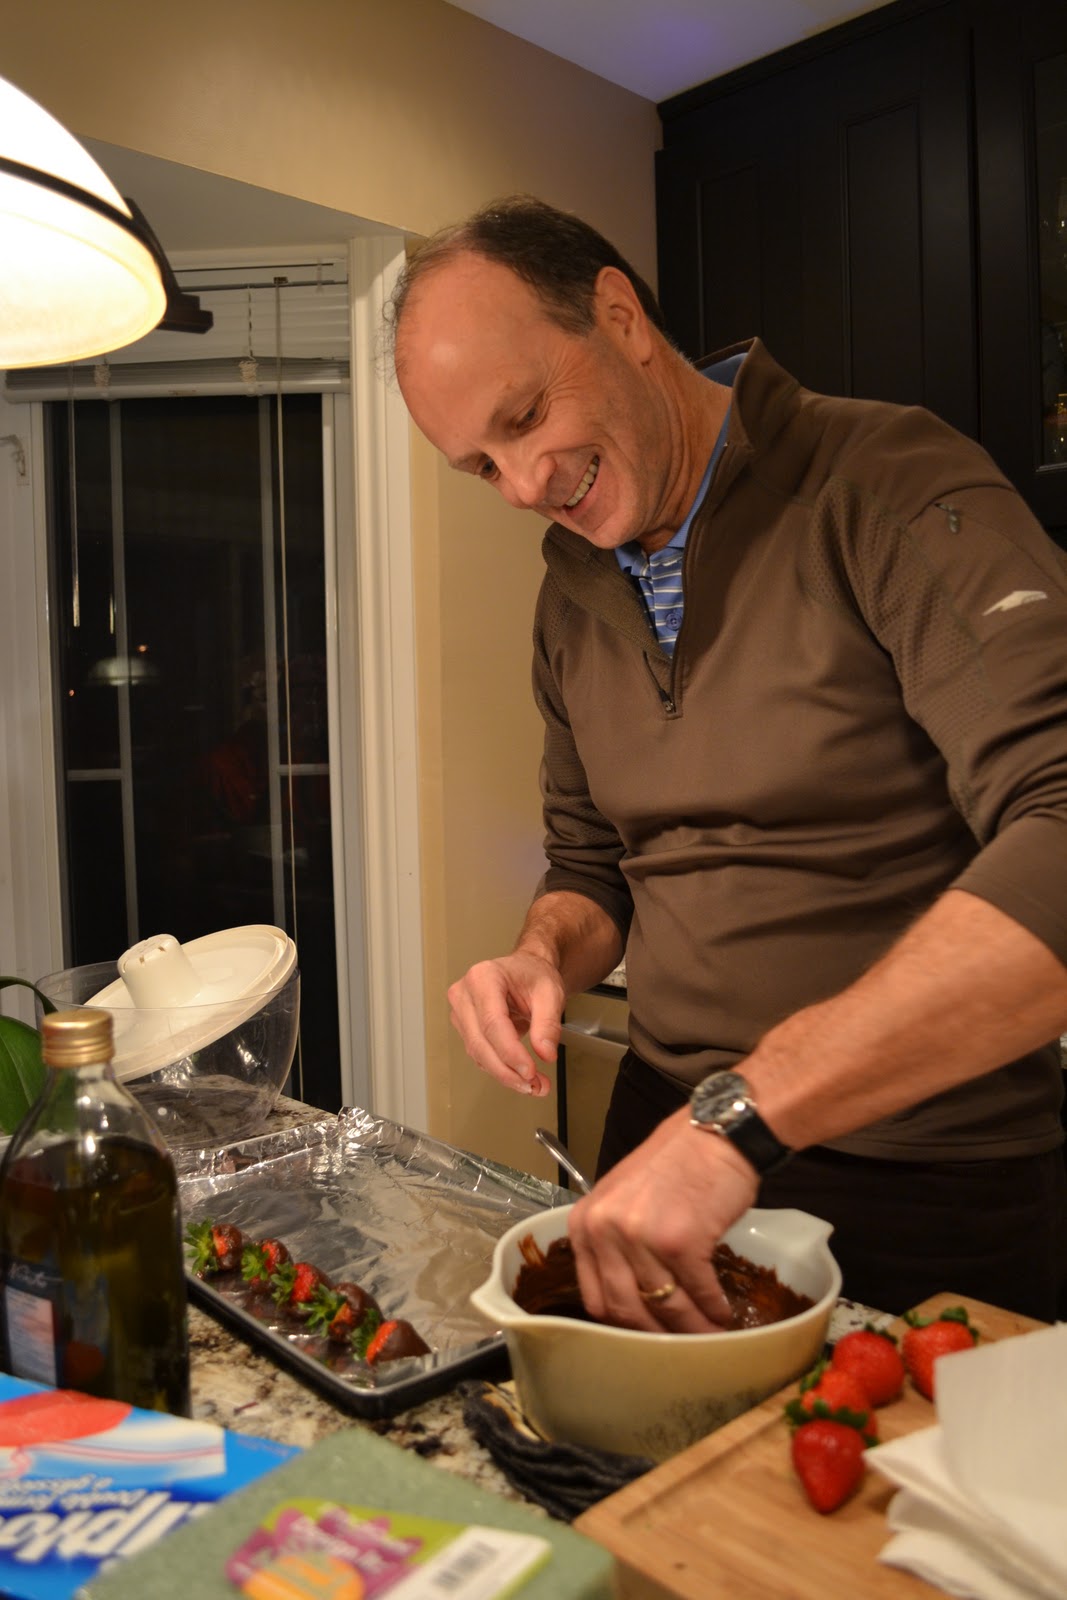
This isn't difficult but it does require a lot of time and effort!  No wonder it's a business on it's own.  It's best of have a variety of different fruits for lots of colour and texture, as well as large fruits such as pineapple and melons to use cookie cutters to cut out fun shapes appropriate for your occasion.  For a special treat for Steph's shower, we dipped strawberries and apple slices in chocolate.  My father in law was happy to help since there was chocolate involved!  Ryan created a sturdy base by super glueing a styrofoam ball down to a weighted base - we had to ensure it would hold the weight of the fruit, and that as people removed skewers it wouldn't topple over.  

what you need:
  • an assortment of fruits
  • bamboo skewers
  • 1 1/2 cup semi sweet chocolate
  • 1/2 stick unsalted butter
  • 1 pinch of salt
  • lemon
what to do:
  1. Prep fruit by cutting into various cubes/shapes/sizes.  For fruits that brown (e.g. apples, pears) - be sure to squeeze fresh lemon juice over them to prevent browning.
  2. In a double boiler, melt chocolate together with butter.  Remove from heat once melted and add pinch of salt.  Line a cookie sheet with parchment paper or aluminum foil - hold strawberry by the tops and dip into chocolate, then place onto sheet.  Once your sheet is full, refrigerate for at least 2 hours to ensure chocolate is set and easy to handle to skewer.  (You can dip other fruits in the chocolate as well - we did some apple slices but it was tricky because the chocolate would sometimes slip off the fleshy parts of the apple).
  3. Create random skewers of fruit and leave at least 2 1/2 inches at bottom of the skewer so that you can stick them into the styrofoam ball.  Continue sticking fruit skewers into the ball - try to stick them into the ball somewhat evenly around so that you don't have one side heavier than the other.
  4. Enjoy!
Bevan dipping strawberries...

Bevan licks the chocolate bowl clean!

a bridal shower


Last weekend I helped cater a bridal shower for Steph, my cousin in law.  It was hosted by my mother in law and before we knew it, the guest list was 40+!  Everyone pitched in to help and it was a great success - there was plenty of food for seconds, a variety of flavours to please all palates, and most importantly, a happy bride that was showered with lots of love and gifts.

Our spread included lots of delicious breads, coffee cake, muffins, and tea biscuits baked by a few different aunts and a bakery in Shawville.  I made a few appetizers and dishes (with lots of help from Sue and Aunt Nancy!) which included bok choy salad, mini omelette tartlets, fruit bouquet, crostini with dips (white bean, hummus, olive tapenade, and creamy caramelized onions), spanikopitas, and panko crusted chicken fingers.
Sue and Nancy making lots of spanikopitas
cooking in my in-laws' newly renovated kitchen
(love this granite island)
the shower

Steph and Abby

bok choy salad

my version
the original - Laureen's
A few weeks ago I had this amazing salad alongside a fish fry!  It is super refreshing, light and very addictive.  I made it for Steph's bridal shower and everyone loved it (even those who had never tried bok choy).  The recipe makes quite a big salad - left overs are good until the next day.  Here's my version of the salad:

what you need:

  • 1 package baby or regular bok choy
  • 1 package bean sprouts
  • 2 green onions
  • 1 handful cilantro
  • 1 package ramen noodles
  • 2 cloves garlic, grated
  • 1/4 cup canola oil
  • 1/4 cup rice wine vinegar
  • 1 tsp sesame oil
  • 1 1/2 tbsp brown sugar
  • 1/8 cup soy sauce
  • black pepper, to taste
what to do:

  1. Cut off bottoms of bok choy and separate each leaf individually.  Wash thoroughly allow to dry (pat with tea towel or leave in sieve for awhile).  Rinse bean sprouts and allow them to dry as well, or spread on tea towel and dry gently).
  2. Stack boy choy leaves, about 5 at a time, chop into thin 1/2" slices width wise, and place into a large salad bowl  Finely chop green onions and add to bowl.  Roughly chop cilantro and add.  Then add the bean sprouts.
  3. Mix the rest of the ingredients (except for the ramen noodles) in a jar or tupperware and shake well, until sugar is dissolved.  This dressing can be kept in the fridge for several days.
  4. Right before serving the salad, toss all vegetables with dressing.  Remove the small flavour package from inside the ramen noodles and crush the dried noodles into little bits.  Top the salad with the noodles for extra crunch and texture.  Enjoy!

Friday, October 7, 2011

butternut squash ravioli

homemade ravioli with brown butter sage
Two days after we ran the medtronic twin cities marathon in Minneapolis, we were back in Thunder Bay and still hungry.  Homemade butternut squash ravioli with brown butter sage was so good that even though it took a lot of labour and time to make them, it was definitely worth the effort!  The salmon (caught in Lake Superior) was baked with lemon juice, dill, salt and pepper - simple and very fresh.

I've seen in other recipes that you need semolina flour to make fresh pasta - but we forgot to get some so we just used all purpose flour.  It tasted really good and worked out fine!

what you need:
*serves 2-3
  • 1 1/4 cup flour (or use half portion semolina flour and half all purpose flour)
  • 2 large eggs
  • 1/2 medium sized butternut squash
  • 2 tbsp butter
  • olive oil
  • salt & pepper
  • 6 fresh sage leaves
  • 1 head of garlic
  • 1/4 cup butter
  • Parmesan cheese, 1/2 cup freshly grated
  • a little extra flour for work surface
what to do:
  1. Preheat oven to 450 F.  Cut up squash into small 1" cubes, toss lightly with olive oil, salt and pepper.  Spread cubes onto a baking sheet.  Cut a little bit off the top of the garlic bulb and drizzle a little olive oil on top and add a pinch of salt.  Wrap with tin foil and place on the baking sheet.  Bake for about 20-30 minutes, depending on your oven.  Check at half time to make sure they aren't burning and give them a toss for even browning - the squash is ready when it is fork tender and golden brown.  The garlic should easily squish (use oven mitts and gently squeeze to check).  Allow squash and garlic to cool to room temp.
  2. Remove skins from squash and place roasted squash into a bowl to mash.  Add 2 tbsp butter and squeeze the roasted garlic into the mixture - mash well.  Add a small pinch of salt and pepper.  You can also add grated Parmesan cheese (about 1/2 cup) and mix.
  3. On a clean counter top, make a mound with the flour and semolina flour.  Make a hole in the centre and crack one egg into it, mix with a fork until some of the flour incorporates with the egg. 
                                     
                                               eggs in the middle
    Add the other egg, and keep mixing until all the flour is incorporated.  Use your hands to knead the dough - if it seems too dry, you can add a little bit of water (1 tbsp at a time).  If it's too sticky/wet, add a little bit of flour.  Divide dough into four small even balls and roll them until 1/4" thick.  Fold in half and then in half again, then this time roll the dough out as thin as possible (this takes muscle!) - or you can use a pasta roller. 
    rolling the dough thin enough to see the black granite
     Try your best to make the sheets about the same size and shape - doesn't have to be perfect!
  4. Place 1 heaping teaspoon of the squash mixture onto the pasta sheet - each sheet should fit about 4 separate teaspoons.  Be sure to space them out to leave space to seal filling well.  Brush a little bit of melted butter around the squash mixture, then lay another sheet of pasta on top and cut into squares with a knife or ravioli square cutter.  You will have to use the back of a fork to press down around the edges of the filling to ensure a tight seal (or else it will fall apart when cooking!).  Any left over pasta can be re-kneaded and rolled to make another sheet.  Work quickly as the dough will dry out.
  5. Bring a pot of water to boil and add a few dashes of salt.  Gently place ravioli into pot and allow to cook, about 2-3 minutes. 
     They won't take too long, once they start
    floating to the top they are ready.
  6. In a small sauce pan on medium, heat up the 1/4 cup butter.  (add a tiny pinch of salt if it is unsalted)  Add the sage leaves, and watch, swirling occasionally - it will start to bubble/foam - and as soon as the butter begins to change colour watch carefully - take it off the heat once it browns.  
  7. Serve ravioli with about 1 tbsp brown butter drizzled on top, and garnish with the cooked sage leaves (they will be crispy, like a chip).  You can garnish with extra Parmesan shavings - enjoy!
little brown dots of goodness from the butter
we actually didn't have Parmesan cheese in our filling so
instead we topped each tsp of squash with a small slice of bocconcini.

my thunder bay experience

I had the pleasure of spending a few days in Thunder Bay with my friend Jillian and her family and friends.  I guess you could call it somewhat of a "Northern Canadian" experience!  One night we had a fish fry with pickerel that they caught the week before from Lake Superior (yum, doesn't get fresher than that!) and some amazing salads (recipe to come!) and appetizers.  It was supposed to be a small gathering - but after a day of running errands we ended up collecting a few more guests and soon it became a fun dinner party with lots of wine and awesome food.  Another night we made Lake Superior salmon (I honestly didn't know salmon was in fresh waters) with homemade butternut squash ravioli.  Nothing beats delicious food, spending time with friends, and meeting great people.

Laureen and Jillian, in their gorgeous kitchen
pickerel!!
Andy frying up some yukon gold potatoes, Criff watching
                                        
beer battered pickerel
serving up some salad
Fish fry dinner, all plated up!
homemade pie (wild blueberries picked  in Tbay)
gossiping ladies :)
men outside, frying of course

Tuesday, September 20, 2011

salmon with thai-inspired salsa

fresh and flavourful
Salmon is a great vehicle for flavour, you can make it quite plain but top it with a delicious sauce and you're set! Tonight it was topped with a fresh mango salsa - served alongside steamed broccoli - and it was pretty great.

what you need:
*serves two
  • fillet of salmon for 2 (about 16 ounces)
  • 2 tbsp light soy sauce
  • 1 garlic clove, chopped finely
  • 1 tbsp ponzu
  • freshly ground black pepper
  • canola oil
thai salsa:
  • 1 mango
  • 1 sweet red pepper
  • 1 small bunch of cilantro
  • 1 green onion
  • 1 clove of garlic
  • 1-2 green thai chilies
  • 1/2 lime - zest and juice
  • 1 tsp thai fish sauce
  • 1 tsp rice wine vinegar
  • 1 tsp ponzu
  • small pinch of salt
what to do:
  1. Marinate salmon in soy, ponzu, garlic, and black pepper.  Add about 1 tsp canola oil.  Let it rest for about 10 minutes, flipping salmon once at 5 minutes.
  2. Prep salsa ingredients - dice mango and red pepper into about the same size.  Finely chop garlic clove.  Thinly slice green onion, chilies, and cilantro.  Mix all salsa ingredients together and then set aside in the fridge.
  3. In a non-stick pan, put 2 tbsp of canola oil on medium heat.  Once the oil is heated, about 1-2 minutes, place salmon carefully in pan - you should hear it sizzle.  Cook for about 2 minutes, then flip salmon carefully and cook for another 2-3 minutes.  Lower the heat to medium - low and cover pan with lid.  Cook for about 2-3 more minutes, depending on how thick your salmon is and how you like your salmon cooked.  (If you like it medium-rare, the thickest part of the salmon should feel a little bouncy when you lightly poke it with a cooking spoon.  If you like it medium-well, it should feel firmer)
  4. Remove salmon from heat and top with heaping spoons of the salsa right before serving.  Enjoy!

sweet and sour pork

front and centre - a tasty addition to an already asian meal
So a few of my undergrad friends came to visit this weekend and they requested a few dishes from this blog.  In the picture you can see also ginger soy beef , soy glazed jie lan (asian broccoli), dragon noodles, and wild rice.  I thought I'd try something I've never made before - sweet and sour pork.  In restaurants the pork is usually battered, deep fried and very crispy - obviously delicious - but I don't own a deep fryer!  It is also healthier to cook the pork in a non-stick pan anyway:)

what you need:
*serves 6

  • 6 centre loin pork chops
  • 2 red bell peppers
  • 1 large red onion
  • 1/3 cup corn starch
  • 2 tbsp soy sauce
  • canola oil
sweet and sour sauce:
  • 3 cloves garlic, roughly smashed
  • 2 tbsp soy sauce
  • a few dashes of Worcestershire sauce 
  • 2 tbsp orange juice
  • 1/3 cup ketchup
  • 3 tbsp apple cider vinegar
  • 2 tbsp sugar
  • 1/4 cup water
  • pinch of salt & black pepper
  • 1 tbsp corn starch

what to do:

  1. Prep pork by cutting into bite size cubes (about 1") and place in a large bowl.  Toss until evenly coated with soy (add another tbsp if it doesn't look like enough), and then toss to coat with 1/3 cup corn starch.  Set aside in fridge or on counter top if you are going to cook it soon (meat cooks better if it's warmed up to room temp - cooking it straight from the cold fridge can make it tough).
  2. Cut bell peppers and red onion in about the same size cubes as your pork.  Set aside in a bowl.
  3. Mix all sweet and sour ingredients except for corn starch.  Taste, and adjust if required.  (You may find that you want it more sour....so add vinegar.  Or if you want more tang, add a little bit more ketchup and Worcestershire).
  4. Heat a large non-stick pan on medium with 2 tbsp canola oil.  Brown the pork in batches, because if you overcrowd the pan they won't get browned and will just steam/cook.  Once browned and cooked (about 2 minutes per side), remove and place on a rack or paper towel to drain excess oil.  
  5. Add 1 tbsp canola oil to the same pan and on medium heat, sautee onions and peppers, about 2 minutes.  Once slightly softened, add the sweet and sour sauce mixture.  Turn heat to medium - low and allow it to simmer, then add the browned pork cubes.  
  6. In a small bowl, mix 1 tbsp corn starch with about 3 tbsp water.  Add it to the simmering mixture while you stir, to avoid lumps.  Stir for about 2 more minutes, until sauce thickens.  Remove from heat and serve alongside rice.  Enjoy!

dinner time
happy friends eating